
Linux Virtualization with a Mounted Windows Share on Client Hyper-V
Published on:Table of Contents
This article was last updated: March 23th 2016
This is a walkthrough of setting up virtual Linux machine hosted by Hyper-V and being able to share files between the host OS and the Linux machine. For those curious on what this post will accomplish, here is a breakdown of what will follow:
- Setup a internal virtual switch in Hyper-V
- Allow internet connection sharing to the internal virtual switch
- Connect to the Linux virtual machines via PuTTY
- Mount a Windows drive so that the Linux machine can access those files
I’m not new to Linux virtualization on client Hyper-V. I’ve written about my struggles before. When I first wrote it, I had a whole list of complaints that made my life difficult, but if you read the entire post, the latter half contains workarounds for my issues. Now, after more than a year in passing, I’ve decided to write a little tutorial for those who are having troubles working with Linux virtualized through Hyper-V.
It should be noted that when I say “client Hyper-V” I’m talking about the feature starting in Windows 8 that allows non-server grade computers to partake in virtualization. Gone are the days of partitioning drives in order to dual boot operating systems. Now the only limitation is how many operating systems one can running simultaneously before they exhaust RAM.
There is the traditional version of Hyper-V, which is ran off a server and boosts additional features dealing with recovery GPU virtualization, but for the most part, they are the same.
Requirements
These instructions should work for other versions of Hyper-V and other versions of Linux, but these are the requirements for client Hyper-V.
- 64-bit system that has Second Level Address Translation (SLAT).
- 4 GB of RAM
- Client Hyper-V is enabled. In Powershell code:
Enable-WindowsOptionalFeature –FeatureName Microsoft-Hyper-V -All - Administrator privileges on the Window’s and Linux boxes
Setup
Navigate to the folder that is supposed to be accessed from the Linux machines
and enable sharing. Remember the UNC path to that location. Generally it is of
the form \\%COMPUTERNAME% followed by the file path without %SystemDrive%.
For instance, I store my source code in C:\Projects, which when shared is
\\Nick-PC8\Projects.
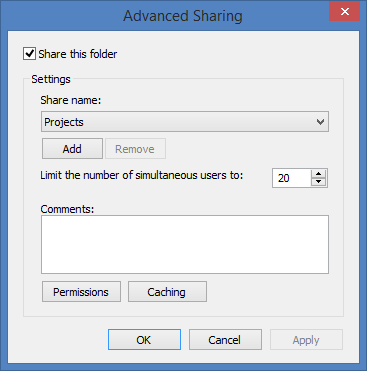
Windows Share
Next, navigate to the Hyper-V and create a new virtual switch connected to the internal network. I chose the name “Internal Switch”. Having an internal switch allows communications among virtual machines alongside host communications.
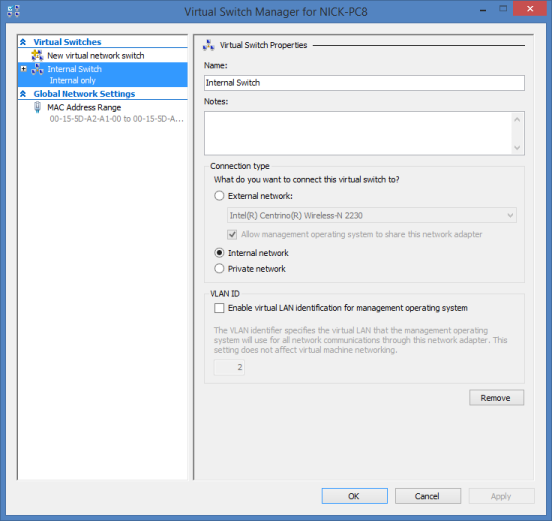
Internal Switch
Now, enable Internet Connection Sharing (shown in next screenshot). The internal switch that was previously created will be used as the wired hub. What this means is that the host and the virtual machines can access the outside internet, but the outside world cannot access the virtual machines by default. There are settings that you can enable to allow connections to the virtual machine outside the host machine. Please see section on Connecting from the Outside World
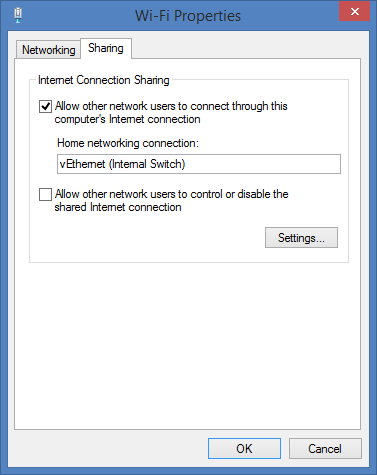
WIFI Properties
Installation
For demonstration purposes, I will show how to setup a Fedora machine, but note this technique works for all versions of Linux that I have tried. Personally, I am more of a Linux Mint fan.
Always install from an .iso image, as it is by far the easiest and quickest. In the following screenshots, I’m installing Fedora 18 from an .iso image. I normally run my Linux virtual machines at 512MB of RAM. It doesn’t sound like much, but there has only ever been a couple instances when I’ve needed to restart a virtual machine with 1024MB (ironically, it was this installation of Fedora and F# when I couldn’t wait for swap space). Otherwise, I can run a node and flask webserver at the same time and still have plenty of RAM left for development.
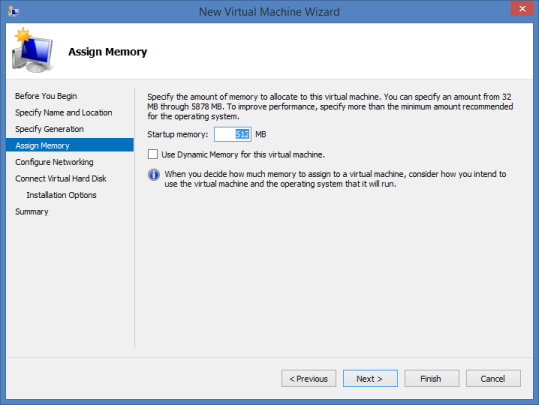
VM-Memory
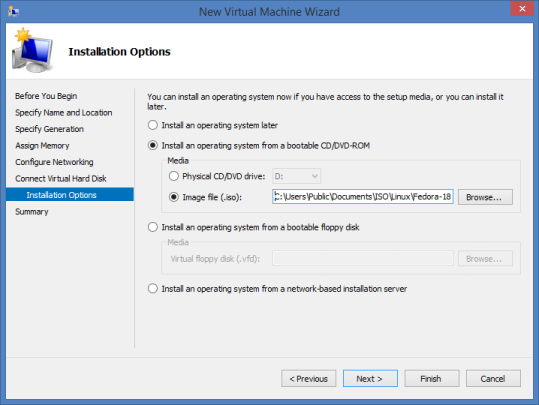
VM-ISO
At this point, I’m assuming that the Linux version is installed. The first order of business is to start the ssh daemon. Hyper-V doesn’t have the best support for Linux machines, and so there are severely limited screen resolutions and third party products such as connection via VNC doesn’t solve this problem. By allowing clients to connect through ssh, we can connect the Linux and Windows host through PuTTY.
service sshd start started the ssh daemon on Fedora.
Next step is to point PuTTY to our Linux machine. Execute ifconfig eth0 on
the Linux machine and copy that IP address into PuTTY and login.
This is only a terminal view of the Linux machine. If a graphical interface for programs is necessary, enable X11 Forwarding using Xming and PuTTY
To enhance the colors of the terminal, I recommend 4bit.
Mounting the Shared Folder
At this point, if there is no need to mount a shared folder, then there is no need to continue.
Edit /etc/hosts and append a line that contains the IP address of the host
machine and the host machine’s name. This allows us to refer the host machine
by name instead of IP address. For instance, here is what my hosts file looks
like.
192.168.137.1 Nick-PC8
I recommend storing the username and password to access the shared in a secure file on the Linux machine in the following format (I called the file .smbcredentials). We’ll use this file to connect to shared folder.
username=Nick
password=password-to-host-machine
To secure the file such that only owner can read or write the file chmod 600 .smbcredentials.
In /etc/fstab the following line is added, which allows the shared folder to
be mounted. Only the first two paths should be of interest in the file. The
first one is where the share is located and the second is where to mount it on
Linux machine.
//Nick-PC8/Projects /mnt/Windows cifs credentials=/home/nick/.smbcredentials,_netdev,rw,iocharset=utf8,soft,uid=1000,gid=1000 0 0
Quick rundown of some of the options (here’s the online man page for
mount.cifs)
- rw: mount the Windows drive as a read and writable drive
- uid: user id who will own the files on the share. My uid is 1000 (
id -u) - gid: group id who will own the files on the share. My gid is 1000 (
id -g) - _netdev: the only undocumented option, see this StackExchange for more information (but I’ll copy the important bits here). _netdev will ensures that the drives won’t get mounted if you have no network or if you are on the wrong network. It also makes sure your shares get mounted/unmounted when you switch networks"
Then sudo apt-get install cifs-utils to ensure that you have the
necessary programs to conenct to the share.
Finally, to top everything off, the last commands make the directory and mounts the shared folder.
mkdir /mnt/Windows
mount /mnt/Windows
Enjoy browsing the mounted filesystem!
Areas of Improvement
Clock Drift
An annoyance is clock drift. When the host machine is put to sleep, the
clocks on the Linux virtual machines stop. Then when the host machine is
awaken, the Linux virtual machines don’t correct themselves, or if they do, it
is in small corrections, as changes in large amount of time can cause
undefined behavior in programs. Thus, whenever I resume work on the virtual
machines I execute sudo ntpd -gq, which forces synchronization of the time.
Cisco VPN
Don’t expect to have your Cisco VPN connection shared from your host to all your VMs, you’ll have to set up the VPN connection individually for each VM. Luckily, it is not terribly difficult if you have the VPN’s PCF (Portable Configuration File).
I’ll not detail the step-by-step, but this
guide has worked
great for me in the past. Essentially you just pcf2vpnc the file and start up
the VPN!
The host VPN will also occasionally encounter errors when connecting:
Secure VPN Connection terminated locally by the Client.
Reason 442: Failed to enable Virtual Adapter
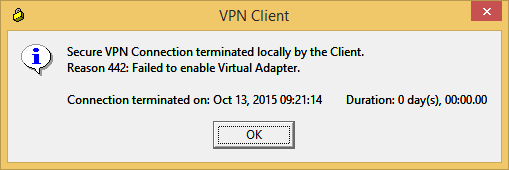
VM-VPN
The trick is to turn off Internet Connection Sharing, before connecting through
the VPN, and once connected, to re-enable it. To toggle the service, you can
execute services.msc and select Internet Connection Sharing.
Cisco AnyConnect
Even easier, is if the corporation uses Cisco AnyConnect because then you don’t
need the pcf file. Instead, install openconnect and connect using
openconnect <ip>. If the program prompts for two passwords, the first
password is your username password and the second password is a fallback
password (i.e., the password prompts expect different passwords).
Terminal Multiplexer
An enhancement that applies to all users of PuTTY is a terminal multiplexer, which essentially allows for multiple terminals in a single PuTTY session. Instead of having five PuTTY sessions open and juggling them; simply have one with five terminals.
Personally, I’d recommend GNU Screen because of its ubiquity, but I’ve heard good things about tmux. Learn and use one of them and you won’t regret it.
Connecting from the Outside World
This section was added on December 24th, 2014
If you are like me and run the VMs on a less than portable machine (a desktop or a bulky laptop), but wish you could connect from anywhere on the network, listen up. Open up the sharing tab in the WI-FI properties and click the “Settings” button to open a list of serviecs.
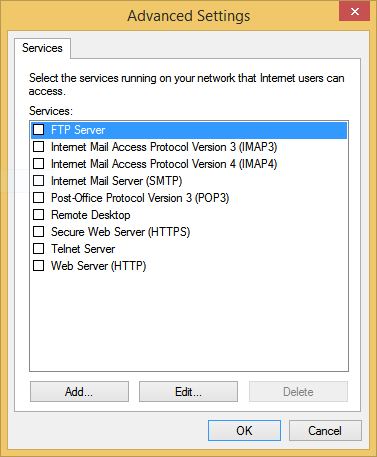
VM services
Here, we are going to add a new one. The goal is to setup the host machine to forward connections on an external port to the VM’s ip address on port 22 (the default ssh server port). To connect to the VM from your desired workstation, point an ssh client to the host machine’s ip address. If you plan on multiple VMs, then you need to find a unique external port for each VM (I recommend the high 2000’s).
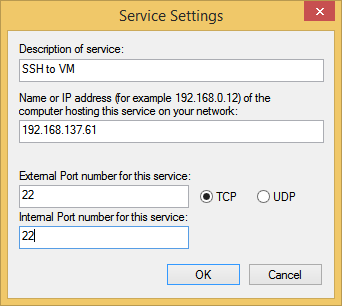
VM add service
It should be noted that this will only work if the host machine and the ssh client are on the same network. Alternatively, if the host machine is assigned a static ip address or can be accessed over VPN, then you can accessed your VPNs anywhere in the world!
Port Forwarding
This section was added on July 23rd, 2015
If previous method yielded Connection refused or variations thereof, use
netsh and port forwarding. First make
sure that all the connections that you attempted to add previously have been
removed from the connection sharing dialog.
netsh interface portproxy add v4tov4^
    listenport=22 listenaddress=192.168.1.150^
    connectport=22 connectaddress=192.168.137.61
The previous command says that whenever someone attempts to connect to port 22
on our host machine (192.168.1.150), to forward it onto port 22 of our VM
(192.168.137.61). Now everything should work and these settings will persist
on reboot.
To see all the current port fowardings:
netsh interface portproxy show all

Listen on ipv4:             Connect to ipv4:

Address         Port        Address         Port
--------------- ----------  --------------- ----------
192.168.1.150   22          192.168.137.61  22
Prefer IPv4 over IPv6
This section was added on March 23rd, 2017
It appears that in a recent update of Hyper-v and/or Windows, my linux host’s are resolved to IPv6 address (eg. something like “fe80::5670:cf3a:b334:b9b9%5”). While I’m as excited for IPv6 as the next guy, my VM’s certainly don’t need to resolving to IPv6 addresses. I’ll never have that many machines … in my lifetime.
If everything worked seemlessly I wouldn’t be complaining, but soon my host’s browsers stopped resolving the linux VM at all and my scripts broke because they assumed connections coming from 192.168.137.1, not some IPv6 address. The fix is to disable IPv6 on the Hyper-V Switch as shown below.
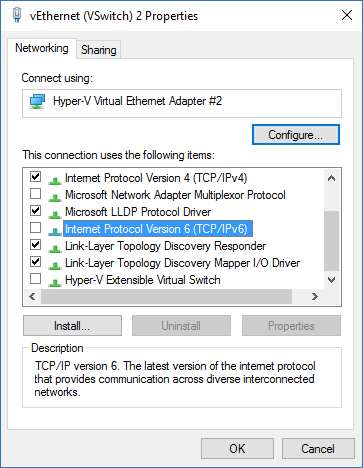
disable ipv6
Comments
If you'd like to leave a comment, please email [email protected]
Not sure whether this is still alive. I thought you may have an idea on this issue - I have been looking for hours but cannot find anything that solves this issue. I have a problem running apt-get (or any other command that requires a download) on Ubuntu 14.04 guest running in Hyper-V (W28K) server. The download always fails. However, the internet connection from the Ubuntu server works fine as I can ping from it successfully and connect into it with SSH or to the Web server it is running. Thanks.
Matt, I wasn’t able to recreate your problem when I followed the above steps. Are you sure your switch is configured correctly?
Thank you very much
I am in the process of downloading a Linux image from a cloud hosting provider. The aim is to mount the image within Windows Server 2012 Hyper-v. Is there any step by step guide to follow to successfully complete the installation/mount the image within Windows 2012 hyper-v?
Hey Nick.. Just wanted to say thank you for this guide. I have searched far and wide previously - tried to establish a workable solution between my windows host and linux guest and failed until I came across this. Cheers!
This is perfect. Thank you so much!
Thanks! Great guide!
I did have to use the real network name of the host PC in my hosts file to get it to work with an alias.