
Cloudflare Tunnel saved my home server when my apartment got a new ISP
Published on:Table of Contents
My apartment building recently switched ISPs. After they finished installing, all the sites I host on my home server were no longer accessible. Cue slight panicking, as I host everything from code to documents to analytics to a dozen other use cases.
I thought my dynamic DNS client, dness, would save the day, but it had already detected, propagated the new WAN IP, and the problem persisted.
What happened and what was the fix?
Previously, my home server relied on being issued a publicly addressable IPv4 address that a router could port forward HTTP traffic.
But IPv4 addresses are running out, so some ISPs are introducing a middleware translation layer, or more specifically, a Carrier-grade NAT, between yourself and the open internet, so that a single IP address can service multiple customers.
The NAT is visible if one compares the IP address reported by the router and the IP address reported when visiting Google
The disadvantage with the NAT is that the port forwarding I relied on broke, as I no longer had a public IPv4 address.
Thankfully, a myriad of tunneling daemons have sprouted over the years that allow us to circumvent the restriction. Most notably, Cloudflare tunnel. The tunnels will allow me to continue hosting sites without a public IPv4 address.
Setup
The home server has everything installed through Docker and the Cloudflare tunnel, cloudflared, is no exception.
Below is the Docker compose file used in entirety.
version: "3"

services:
  cloudflared:
    image: cloudflare/cloudflared:2022.10.2-amd64
    container_name: cloudflared
    restart: 'unless-stopped'
    environment:
      - "TUNNEL_TOKEN=$TUNNEL_TOKEN"
    networks: [web]
    command: tunnel --no-autoupdate run

networks:
  web:
    external: true
Couple notes:
- We supply the authentication tunnel token given via the Cloudflare UI as an environment variable. A better solution, if security is a priority, is to follow the steps outlined in a github issue that dump the credentials to a file that can be later imported as a secret.
- The external
webnetwork is a docker network with Traefik at its center, reverse proxying the individual apps.
Traefik updates
With Traefik no longer being the port of entry for the self hosted sites, some significant changes needed to be made.
Remove exposed ports
A straightforward update is that traefik no longer needs to expose ports on the host machine, as all traffic will be coming from cloudflared, which is already inside the same docker network:
 services:
   traefik:
     container_name: traefik
     # ...
+    networks: [web]
-    networks:
-      - web
-      - default
-    ports:
-      - "80:80"
-      - "443:443"
Add site configuration
For each individual site on the server, I needed to take the following steps.
Delete the existing DNS A record. Cloudflare helpfully lets you know one exists before the tunnel can be set up successfully.
Add the route inside Cloudflare’s UI
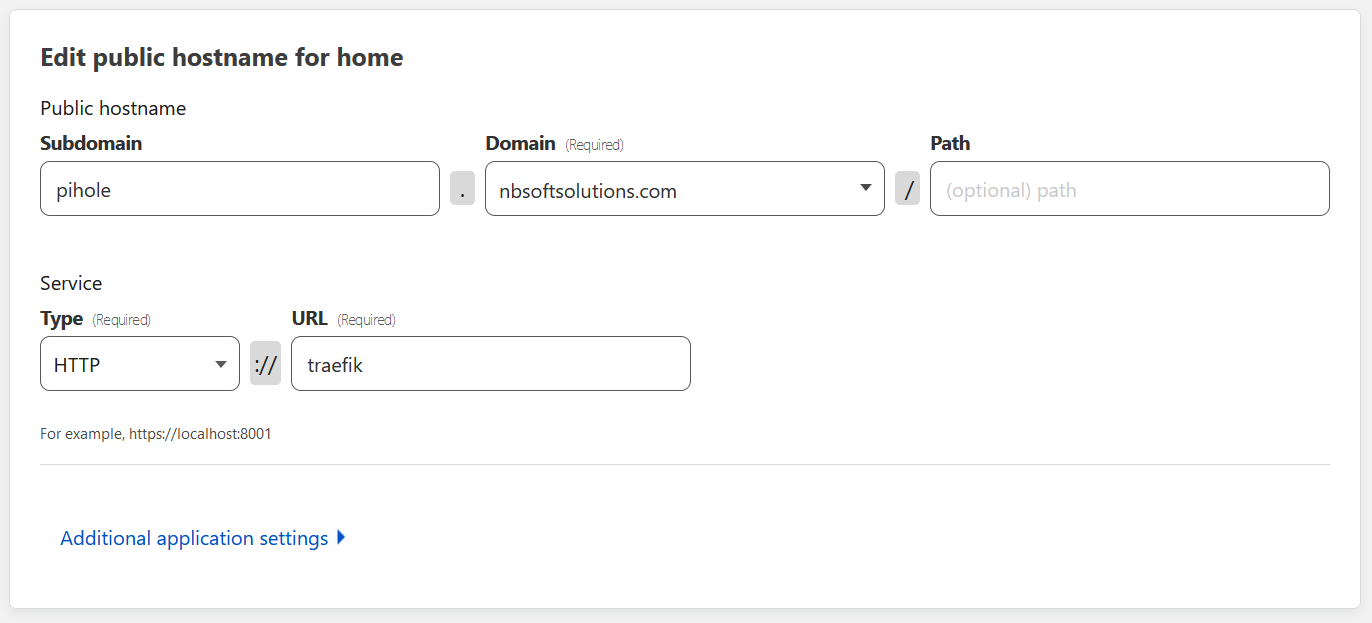
Adding a route in Cloudflare to expose a site to the internet
It may seem weird to see that cloudflared is forwarding to http://traefik, but traefik is how cloudflared can refer to the reverse proxy inside the docker network. And this internal communication can be done all over HTTP.
This does require us to update the docker compose configuration for each site to remove TLS
 version: "3"

 services:
   pihole:
     container_name: pihole
     # ...
     labels:
-      - "traefik.http.routers.router-pihole.entrypoints=websecure"
+      - "traefik.http.routers.router-pihole.entrypoints=web"
       - "traefik.http.routers.router-pihole.rule=Host(`pihole.nbsoftsolutions.com`)"
-      - "traefik.http.routers.router-pihole.tls.certresolver=myresolver"
But that’s it. Rinse and repeat for each site.
The most complicated site configuration was for a dev environment of a Cloudflare Workers / Pages app where only the /api path needed to be routed home. Tacking on api to the tunnel configuration was the only thing required for this special use case.
Move HTTP to HTTPS redirection from Traefik to Cloudflare.
Following this article, setting up HTTP redirection in Traefik was easy enough, but now it is time to undo it:
 services:
   traefik:
     container_name: traefik
     # ...
     labels:
       - "--entrypoints.web.address=:80"
-      - "--entrypoints.web.http.redirections.entrypoint.to=websecure"
-      - "--entrypoints.web.http.redirections.entrypoint.scheme=https"
-      - "--entrypoints.websecure.address=:443"
And flip a switch on Cloudflare’s side to encrypt all visitor traffic.
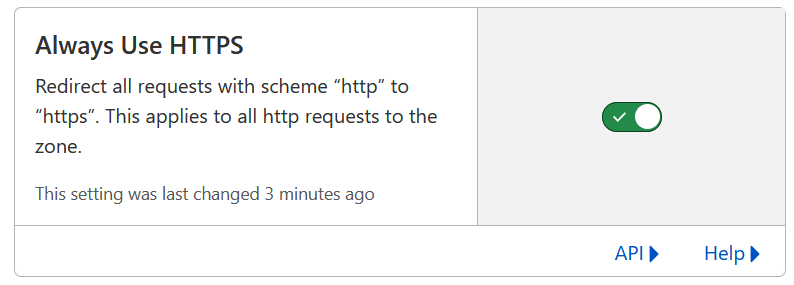
Enable HTTPS everywhere in Cloudflare
Why keep Traefik
With traefik no longer managing TLS or certificates, and cloudflared able to route traffic, what is the point in keeping Traefik, or any other reverse proxy, around?
Here are a few features that I’m using.
- Add basic auth middleware to otherwise unprotected apps
- Fixup troublesome request paths before they reach the app
- Restrict max file upload size
There’s other middleware as well like compression and retrying requests.
It’s nice how all sites can be configured on Cloudflare’s side to just point to http://traefik. It’s one less thing to keep track of.
Downsides
Before Cloudflare tunnel, I self hosted a docker registry for docker images of personal projects. A smoke test after migrating to Cloudflare tunnel showed I could pull images fine, but when I went to push a new image, the push would fail. Turns out there is an upload limit that my docker images were exceeding. I’m unsure of the exact limit, as the Cloudflare docs aren’t clear on this, but I believe it is 100MB per the worker platform limits.
The image push failed at an unfortunate time, so I quickly switched to hosting under Github’s ghcr.io, and no longer selfhost a docker registry, which is a bit of a tough pill to swallow. I could split the hosting, as most images are under the threshold, but decided against it to aid simplicity; I don’t want to juggle multiple registries.
Another downside, albeit minor, is that I can no longer have a local DNS override to point to the server’s internal IP address and maintain TLS.
Conclusion
Is the solution perfect? No. Overall, I’m happy how fast I went from a panic to finding this solution.
I’ll have to add ssh too next!
Reference
For reference, here are abbreviated docker compose files in the full:
traefik:
version: "3"

services:
  traefik:
    container_name: traefik
    image: "traefik:latest"
    networks: [web]
    command:
      - --entrypoints.web.address=:80
      - --entrypoints.websecure.address=:443
      - --providers.docker
      - --providers.docker.exposedbydefault=false
      - --providers.docker.network=web
      - --certificatesresolvers.cloudflareresolver.acme.dnschallenge=true
      - --certificatesresolvers.cloudflareresolver.acme.dnschallenge.provider=cloudflare
      - --certificatesresolvers.cloudflareresolver.acme.email=$CF_API_EMAIL
      - --certificatesresolvers.cloudflareresolver.acme.storage=/letsencrypt/acme.json
    environment:
      - "CF_API_EMAIL=$CF_API_EMAIL"
      - "CF_API_KEY=$CF_API_KEY"

    volumes:
      - "/var/run/docker.sock:/var/run/docker.sock:ro"
      - "/etc/traefik/cloudflare-acme:/letsencrypt"

networks:
  web:
    external: true
And an example site:
version: "3"

services:
  rstudio:
    image: rocker/tidyverse:3.6.3
    container_name: rstudio
    restart: 'unless-stopped'
    networks: [web]
    volumes:
      - main:/home/rstudio
    env_file: rstudio-variables.env
    labels:
      - "traefik.enable=true"
      - "traefik.docker.network=web"
      - "traefik.http.routers.router-rstudio.entrypoints=web"
      - "traefik.http.routers.router-rstudio.rule=Host(`r.nbsoftsolutions.com`)"

volumes:
  main:

networks:
  web:
    external: true
Comments
If you'd like to leave a comment, please email [email protected]