
Stumbling with WebGL Image Processing
Published on:Over the past week I’ve tried to teach myself WebGL, so that I could leverage the GPU for a performance boost. I emphasized “tried” as a week later I don’t have anything to show for it, as WebGL (and my assumption: most GPU coding in general) has a notoriously steep learning curve. I’ve decided to momentarily shelve these ambitions as the stress of a new job during the day and wrangling a difficult API at night was too much to handle. But I still wanted to write this post for a few reasons: we all experience “failures” just that these aren’t talked about so much, catharsis, and so that I can accurately state the problem when I inevitably circle back (or to better provide context for those knowledge in WebGL to help). Sorry for readers who happened upon this site in search of a solution: I have none.
The original motivation for learning WebGL is that in an app I develop, Rakaly, the #1 visualization users look at is the map of their save file. This map is of the world and is quite large: measuring a little over 11.5 million pixels:
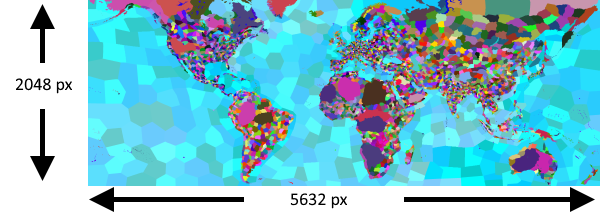
Map of the world in 11.5 million pixels
A unique property of this map is that every province on both land and sea has a unique color. This should be more apparent when looking at a subslice of the image at 1:1.
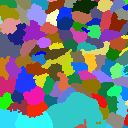
Raw image at 1:1 resolution showing unique colors
This raw image is preprocessed so that the pixels are transformed into an array of province ids. The province ids are 16 bits instead of 24 bits of RGB (or 32 bits of RGBA) needed for pixel data. This size reduction saves on bandwidth when the user requests map data. We’re transferring an array of 11.5 million elements, anything we can do to save on bandwidth needs to be done (fun fact: when brotli encoded, only 200-300 KB needs to be transferred over the wire which is better than any image codec I’ve tested).
Our province id array is then matched up to another array that contains the color that each province should be. This technique is known as indexed color (or a color palette).
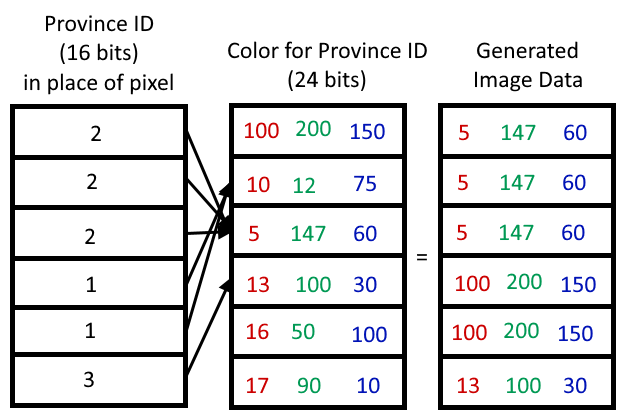
Using indexed color with province IDs to create image data
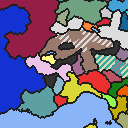
With this technique we can fill in the map with the country colors for who owns the province.
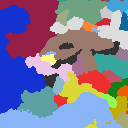
Filled in map with colors representing province owner
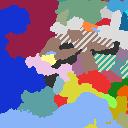
It’s important to note that unlike province IDs, the palette will change depending on the user selection. For instance, if we wanted a map of provinces in the color of the country that controls it, it may look like the following:

Filled in map with colors representing province controller
And overlaying the two maps should result in a clear depiction of disputed territories. This is done by denoting the owner as the primary color, controller as the secondary. Then the row and column index are added together and the color chosen is determined by if the result modulus 6 is less than 3. Gives us nice 45 degree stripes.
Disputed territories are marked with stripes
But it’s not clear who is the owner and who is the controller. The remedy is to employ edge detection from the owner viewpoint to create an edge along political borders and have the borders overlaid in the final stage. The edge detection logic is extremely simple: color each pixel black when it has a neighbor (up, down, right, left) pixel of a different primary color. I employed the same logic in my post 8 years ago.
Map with country borders and disputed territories
From a user’s perspective, it is still hard to make out the map due to the individual provinces being small. Since users can click on provinces to bring up more detailed information, it is important to easily distinguish and click on provinces. So I introduced a toggle where one can change the edge detection algorithm so that borders drawn are between provinces, not countries. The algorithm is still the same as the country borders except it works on the province id array. The result is that it should make it easier to select provinces.
Map with province borders and disputed territories
But there is only so much that can be done at 1:1 scale, so I allow the user to zoom in and take advantage of the browser’s built-in nearest neighbor upscaling algorithm (the alternative of using anti-aliasing results in a blurry image).

Image upscaled 3x with nearest neighbor for pixelated look
The strong pixelation is tolerable, but after being introduced into pixel-art scaling algorithms I am no longer satisfied with this pixelation. For instance, if we upscaled the image using xBR, the result is a buttery smooth image:
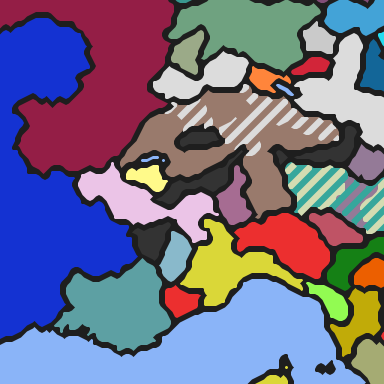
Image upscaled 3x with xBR via GIMP
When one investigates the de facto implementation of xBR, it’ll quickly become apparent that the algorithm is executed on the GPU. While there are variants that can run on the CPU (like xBRz) it is something I want to avoid as I’ve already exhausted the time budget calculating all the prior steps. Wasm can only iterate through 11.5 million pixels so fast. And when upscaled 3x those 11.5 million pixels balloon to over 100 million and there is no way I could convince the CPU to push that many pixels in a timely manner.
For performance context, the simplest image (no borders, no disputed territories) takes 60ms. At the other end, the most complicated (borders + disputed territories) nears 300ms. This doesn’t sound too bad, but this is on one of the fastest processors to date (Ryzen 5900x) and doesn’t take into account what the cost of xBR would be. Not to mention I have ambitions of creating a timelapse of these maps which would require hundreds if not thousands of these maps to be generated. Performance is a feature and the most popular visualization (the map) should not be gated to those with high end hardware.
This is where WebGL comes into play. It allows web developers to tap into the GPU. I’m not familiar with GPU programming. It’s not like learning a new programming language as code for the GPU uses a totally different paradigm. I was not deterred and set out to learn WebGL (specifically WebGL2 as a I don’t mind targeting only evergreen browsers minus safari) to recreate all the previous steps onto the GPU:
- Indexed color
- Conjure stripes somehow (I’m sure there is a more official name)
- Edge detection (both provinces and countries)
- xBR
I tried to tackle the first step of generating the base image with indexed color by blending these three articles:
But ran into some troubles.
All online examples show 8 bit indexed color palettes, but we’re dealing with a 16 bit palette. I ended up arriving at the following but I have no idea if this is the correct way to bind a 16 bit palette as there is not a significant help when things go wrong:
gl.texImage2D(
    gl.TEXTURE_2D,
    0,
    gl.R16UI,
    gl.canvas.height,
    gl.canvas.width,
    0,
    gl.RED_INTEGER,
    gl.UNSIGNED_SHORT,
    province_ids
);
Then I was scratching my head writing the shader, as again, there is a lack of 16 bit palette examples available
#version 300 es

precision highp float;

in vec2 v_texcoord;
uniform sampler2D u_image;
uniform sampler2D u_palette;

out sampler2D outColor;

void main() {
  // In 8 bit palettes they use `* 255.0` so I bumped it to 65535.0.
  // Is this correct? I'm not sure, I couldn't find a definitive answer
  // to the properties of a vec2
  float index = texture2D(u_image, v_texcoord).x * 65535.0;
  outColor = texture2D(u_palette, vec2((index + 0.5) / 65536.0, 0.5));
}
I’m not expecting anyone to be able to verify or help with these contextless snippets, but it started to feel overwhelming stuck at the first step and then some doubts started to creep into my mind:
- Is everything I want possible to do in WebGL? I would feel even more disheartened if I spent a significant amount of time to only hit an insurmountable obstacle
- What if I don’t get a desirable performance boost?
- With some (all?) saying that WebGPU is the successor to WebGL am I wasting my time if I learn WebGL?
These doubts, the high learning curve, and the new job has made me stop learning WebGL if only for a brief time. Maybe I’ll post this to stackoverflow, but I’m not quite sure how to phrase this so that it meets their guidelines.
Comments
If you'd like to leave a comment, please email [email protected]